Raspberry Pi Guide for Magni 6 Robots
What is the Raspberry Pi 5?
The Rasbperry Pi 5 is the smart brain inside your Magni 6 Robots. It’s a tiny computer that helps them move and think. With fast processor, up to 8GB of memory, and a preloaded SD card with our latest image, it can run ROS 2, EZ-MAP, and Open-RMF.
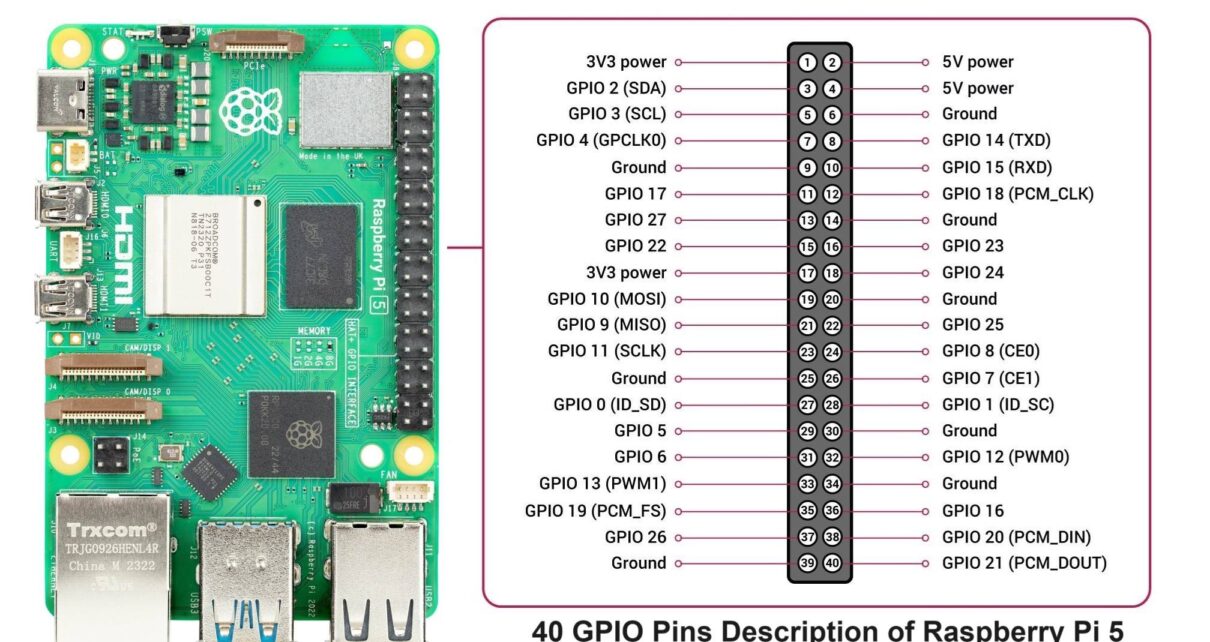
Raspberry Pi 5 Pinout
GPIO Lines Required by Magni Robots
Magni 6 Mini
Feature |
Details |
|---|---|
3.3V |
Gives a small power boost |
5V |
Gives a bigger power boost |
GND |
Acts as a safety ground wire |
[Pin X] |
[Controls something, e.g., motor] |
[Pin Y] |
[Reads something, e.g., sensor] |
[Pin Z] |
[Does something, e.g., signal] |
[TODO: Add the required information in the table above.]
Magni 6 Medi
Feature |
Details |
|---|---|
3.3V |
Gives a small power boost |
5V |
Gives a bigger power boost |
GND |
Acts as a safety ground wire |
[Pin M] |
[Controls something, e.g., arm] |
[Pin N] |
[Reads something, e.g., move] |
[Pin P] |
[Does something, e.g., feature] |
[TODO: Add the required information in the table above.]
GPIO Lines for Customazation
Magni 6 Mini - Customazation Lines
Feature |
Details |
|---|---|
[Pin A] |
[Add something, (light)] |
[Pin B] |
[Use for something, (button)] |
[Pin C] |
[Try something, (sensor)] |
[TODO: Add the required information in the table above.]
Magni 6 Medi - Customazation Lines
Feature |
Details |
|---|---|
[Pin D] |
[Add something, (display)] |
[Pin E] |
[Use for something, (switch)] |
[Pin F] |
[Try something, (gadget)] |
[TODO: Add the required information in the table above.]
Advanced Users Section
If you want to take your Magni robots to the next level, then you can:
Customize the Firmware - Tweak the preloaded software to add new features or optimize performance.
Upgrade Sensors - Experiment with advnced sensors on the free GPIO lines to enhance mapping or navigation.
Note
Feel free to share your projects with us on our blog and tag us on social media.
Getting Started
Ready to start?
Check out Magni 6 Mini Getting Started Guide
Getting started page for Medi is coming soon.
Tip
For more in-depth guide for Raspberry Pi 5, see: Raspberry Pi 5